Hey everyone, today I will have a walkthrough of my network setup of my home and my homelab.
Hardware
- TP-Link SG108E 8-port Managed switch
- HPE Proliant ML150 Gen9 server with Proxmox & OPNSense inside
- Asus Mercusys WAP/Router
- ISP Router
Physical Cabling
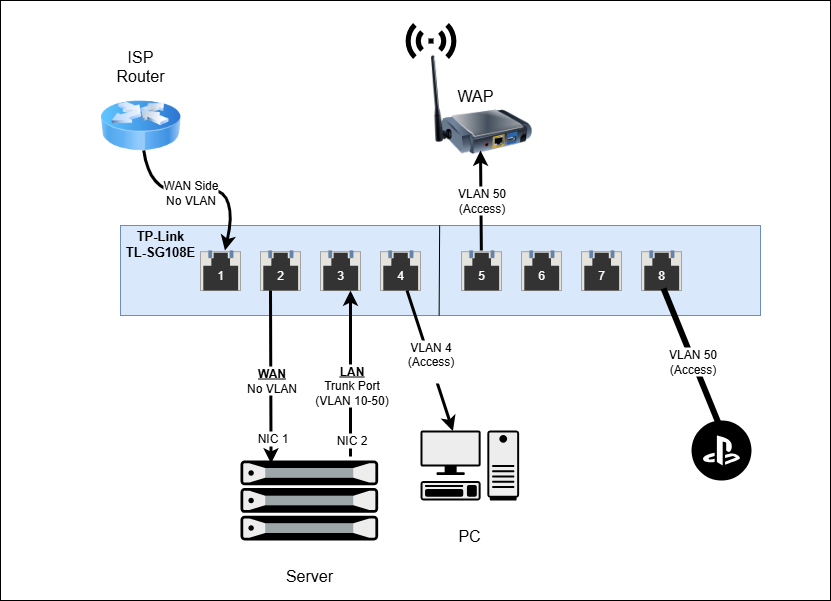
Even though I want to get rid of ISP router and use my server as first contact point with the internet, I couldn’t for couple of reasons.
Firstly, I play with my server a lot. I sometimes reboot it, upgrade it, open it up and so on. So I didn’t want my family and myself to be effected by this. In other words, I wanted a stable internet connection, independent from my server (however, then I decided to do something that was kinda in the middle ground, which I will explain later)
Secondly, my family has an IPTV subscription from the ISP, which forces to use ISP router. There are workarounds, but I tried them couple of times and decided its not worth the effort. I am thinking about cancelling the IPTV anyway. It is Turkcell TV+, and I definitely suggest everyone to stay away from it.
So, in the end, I use my ISP router as main point of contact, but it doesn’t have an SSID and I only use it for IPTV. Then, a cable comes to my VLAN switch from ISP router. Then, there are 2 cables to my HPE server (it has 2 NICs), 1 cable to my WAP, and 1 cable to my Playstation.
VLAN Config
So, since I am planning to scale up my homelab via adding a dedicated NAS, a Raspberry Pi which I already own, and 2 Optiplexes, I know I needed some VLAN setups in the physical switch.
I could already do all the VLANs in the server for VMs and containers, but if I wanted to use physical devices in specific VLANs, I needed to use physical VLAN.
VLAN Setup
Vlan 10 (192.168.10.0): This is for management. It includes my Proxmox web GUI, OPNsense, my Adguard ad-blocker, and other possible core services.
VLAN 20 (192.168.20.0): This is for production. It will include my internet-facing apps. Like game servers, cloud storage, media server, web servers etc.
VLAN 30 (192.168.30.0): This is for labs. Since I love tinkering with technology, I dedicated this area for Linux labs, cyber security labs, and maybe Active Directory if I have to (I hope not)
VLAN 40 (192.168.40.0): This is for random testing. If I want to try an OS, or a specific config, this is where I will do testing without the fear of messing something.
VLAN 50 (192.168.50.0): This is for home network. It includes only my wireless access point, which the household will use.
The WAN side of the OPNsense, which is the ISP router side, does not have any VLAN. In OPNSense, the interface is defined as WAN.
Switch Config
It should have the IP 192.168.10.4, but it is in WAN side temporarily.
So the first port of the switch goes to the ISP router, which does not have any VLAN.
Second port goes to the HPE server as WAN port, so it doesn’t have any VLAN config either. OPNSense does all the routing and switching, and connects to the WAN side without carrying any VLAN config.
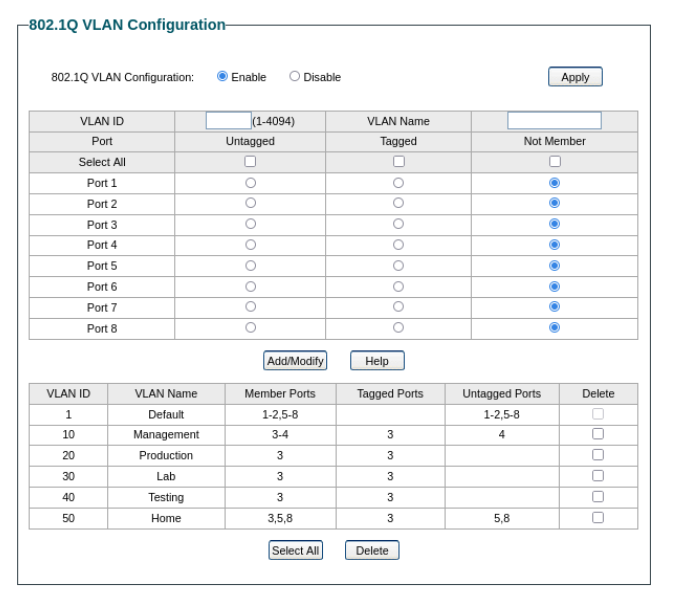
Third port is where all the work starts. This port is LAN port for OPNSense. It is a trunk port that carries all the VLANs. As you see in the screenshot below, it is the only tagged port for all VLANs.
Port 4 goes to my PC, which is in VLAN 10. So I selected it as untagged.
Port 5 and 8 are my WAP and playstation, which connect to my home network with VLAN 50
Other then that, I had to do PVID settings. I forgot about this topic (it had been years I prepared for CCNA) so I spent half an hour troubleshooting.
For people who don’t know what PVID is, it is used for default port VLAN. So when switch is sending a package to my PC for example, it is for VLAN 10. The PC doesn’t see this, since that port is VLAN-unaware, but switch knows it.
However, when my PC sends a package, the switch send it to VLAN 1 (default VLAN) instead of VLAN 10. Because the PVID is 1 in default. It means port 4 will send packages with VLAN tag 10, but will receive packages with VLAN tag 1. This caused problems, so I changed PVIDs accordingly.
This is only being done for access ports, not trunk ports.

Proxmox Config
So in my HPE server, I use Proxmox as bare-metal hypervisor. My network config looks like this:

As I said, I have 2 NICs, one for WAN (eno1) one for LAN (eno2).
In order to use them, I have to create bridges (it might not be absolutely necessary, but it is a good practice). The vmbr0 is the WAN side, thus the gateway.
Note: Normally, I shouldn’t have the 1.10 IP for GUI, since it is on the unprotected ISP side. But I am keeping it temporarily so I can access my Proxmox outside of my house. When I create a more robust solution like VPN or static IP, I will remove it.
The vmbr1 doesn’t have a IP, even though it is the LAN. The reason for that is, the OPNSense creates multiple VLANs using that interface, so those VLANs are used for connection.
I also created a Linux VLAN here (VLAN 10) to have the Proxmox web GUI in the Management VLAN, protected by OPNSense
OPNSense Config
So here is the most complex part. This is the main player of our system. OPNSense is an open-source firewall/router.
Step 1: Physical config
The first thing I did was of course installing the OPNSense. I configured some stuff here, but then I changed them, so it doesn’t matter much.
First, I did the assignments. I had WAN and LAN interfaces. WAN interface uses vtnet0, which uses vmbr0 in Proxmox, which is eno1. There are a lot of steps in between, but I just directed the WAN of OPNSense to the first NIC of the server.
I did something similar for LAN, using the vtnet1 for LAN NIC of the server.
Step 2: VLAN Config
Now, I need to create VLAN devices. To do that, in “Interfaces -> Devices -> VLAN”, I had to create 5 VLANs. Their parent is vtnet1 (LAN). I didn’t define priority, and used the naming convention vlan0.xx

After that, in “Interfaces -> Assignments”, I assigned them to the correct devices.

Then, in “Interfaces -> [Vlans]”, I enabled the interface, set to Static IPv4, and set the IP address to 192.168.xx.1 for default gateway.
With this, VLAN setup in OPNsense is done.
Step 3: DHCP Config
For devices in these VLANs to get an IP address automatically, I had to configure DHCP. It is under “Services -> ISC DHCPv4 -> [VLAN]”
In here, I enabled the DHCP service, gave a range from 192.168.xx.50-99.
I also set the DNS server as “192.168.10.3” which will be my Adguard ad-block container, set the gateway as 192.168.xx.1, and domain name as “lan”. This is the domain I want all my devices to be in.
I also did couple of changes in the config, so I can access all my devices with their hostname.lan instead of their IP.
I use Unbound DNS, as it comes default. I went to “Services -> Unbound DNS -> General” and enabled
- Register ISC DHCP4 Leases
- Register DHCP Static Mappings
to enable static IP assignments on the DHCP server as well as hostnames being automatically given to the DNS server.

Step 4: Firewall Config
In OPNSense firewall, the default rule is deny all. I want to be able check the connection, so I wanted to enable ICMP.
Since I want all VLANs and interfaces to have this rule, I created a floating rule, which is a rule you can just apply any interface you want without having to create over and over again.
I just went to “Firewall -> Rules -> Floating”, and created a new rule. I only selected the interfaces (5 VLANs plus 1 WAN, didn’t include LAN since not in use). Then I selected protocol as ICMP and left everything in default. It allows any source and any destination.
After I applied the changes, I fired up some VMs in different VLANs in proxmox (using the VLAN tag feature), I was able to access all of the VMs!
However, I wasn’t able to access the internet as I didn’t created a rule allowing it. So only for the management VLAN, I allowed all IPv4. I know this is not good practice, and I will be changing it shortly to something more secure.
Adguard Rule
Since I will be using Adguard for network-level ad-blocking, I created a specific rule for any device in any VLAN to be able to access my Adguard container.

Adguard Config
I like using a network-level ad-blocker. It helps especially with mobile devices and family members who are not tech-savvy. I was deciding between Adguard home vs pi-hole, but decided to go with Adguard mainly because of being more powerful and having more options. The main selling-point for me was DNS over TLS, which I am definitely gonna set up in the future.
So I first created an ubuntu container in the VLAN 10 (management) and set the container up as usual. Then I downloaded the Adguard’s installer with
curl -fsSL https://raw.githubusercontent.com/AdguardTeam/AdGuardCLI/release/install.sh | sh -s – -vwhich basically installed everything and gave me an http address to connect.
I then followed the instructions, set the network interface to eth0, and finished. I didn’t add or adjust much.
The only thing I changed was the upstream DNS server. Since I didn’t want to use a third-party DNS server but instead my OPNSense Unbound server, I had to specify my OPNSense’s IP as the usptream DNS server.

Unbound directly sends requests to the Top-level domains, so it doesn’t use a third-party DNS server like 1.1.1.1 or 8.8.8.8, which is great for anonymity and privacy.
Conclusion
There you go, this is my home network setup for privacy, anonymity, security, and ease of use. This setup gives me space to have a secure production environment, freedom to tinker with labs, and easy-to-use organization.