Hey everyone! In this tutorial, I will show how to create a VM template in Proxmox with cloud-init.
Why do we use templates?
In some situations, like creating a lab or a network setup, we need to provision multiple identical VMs. Manually creating these VMs and then adjusting the settings like IP and user takes a considerable amount of time.
To overcome this, we use templates. Templates are pre-created VMs that we can just copy and start using. Their disk, network, OS installation etc are already set up, so we can just clone it and start using.
What is cloud-init?
Cloud-init is a small logical drive that we add in our template. It is used to apply some settings to our template. It will tell the system the username, password, SSH keys etc for easy config. You will get the grasp of it later in the tutorial.
Creating the VM
Step 1: Create the VM
We will be creating a VM with some specific settings.
General: Specify the name, include template to distinguish. Also, I suggest to give the VM ID something high, so you can separate from other VMs.
OS: Select “Do not use any media”. We will import it later.
System: Just add Qemu agent, you don’t have to change anything.
Disks: Remove the default disk. It should show “No Disks”.
CPU: You can give total 1 core. You can always increase later when you clone it to your need.
Note: When installing RockyLinux, I got kernal panic due to the CPU Type. So keep that in mind, if you get a kernel panic, try changing the CPU type to host.
Memory: Again, keep it low. 1024 MB should be enough.
Network: Depends on your network setup. I gave the correct bridge for my system.

Step 2: VM Adjustments & cloud-init
Now we will do some adjustments so our template will work fine.
1- Remove the CD/DVD drive
2- Add a cloud-init drive from the “Add” section. You can specify the storage as “local”, where do you keep your ISO files and backups.
3- Now go to cloud history tab on the left.
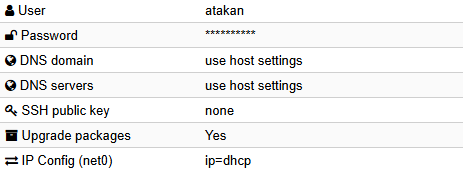
Now, we will define the cloud-init settings. This is mostly personal. Only thing I can say is, in the IP Config, select the DHCP so you can directly connect to them over network. You might also wanna copy your SSH public key for easy access.v
Step 3: Disk Import
Now, we will need to use CLI. First, we will download the cloud image. Then resize, import, and add to our system.
Cloud image: It is a ready-to-use disk. You can download it and start using it without the installation process. You can download your desired OS cloud image by searching. It should be either a .img file or .qcow2 file.
1- Open CLI by going to prox (your node) -> Console or SSH into your proxmox machine.
2- Go to the /var/lib/vz/template. This is the place for your ISO files and such. I suggest using here to keep your system tidy.
3- Create a ‘vm_disks’ directory via mkdir vm_disks
4- Download your cloud-image via wget. I will run the command wget https://cloud-images.ubuntu.com/releases/noble/release/ubuntu-24.04-server-cloudimg-amd64.img for Ubuntu server 24.04.

So now, we downloaded the image. Now, we will make it ready to use.
1- qemu-img resize your_image.qcow2 20G : This resizes our disk image to 20GB. It means it will have this much space. Give a low number, you can increase it later.
2- qm importdisk <template_id> your_image.qcow2 local-lvm : This imports your disk to your template. I used the local-lvm, since it is the location I store my regular VM disks.
3- qm set <template_id> --serial0 socket --vga serial0 : This commands basically enables using serial console to access your VM. It is something related to cloud-init.
4- In the template, go to Hardware. You will see an Unused Disk. Edit it and add it.
5- In the options of your template, in boot order, disable network device and enable scsi device.

Conclusion
There you go! Now, the only thing you need to do is right click to the VM, and convert to template. Then you can easily clone and start using! When it boots, you don’t need to do anything until it asks you for your login info.
Now, you can mass provision VMs.